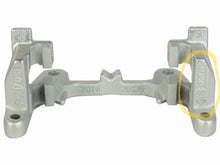
Note: Price increase due to recent changes in material and shipping costs. I am now having these cut from either AR400 plate or 100XF Domex to better support heavy use as cutting or dig brakes. Old price will stay until I have stock on hand.
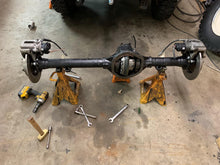
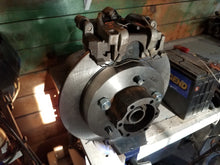
I am proud to announce the release of my early Jeep rear disc brake conversion with the electric emergency brake function for BETA testing.
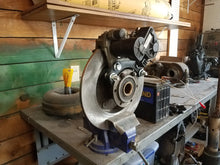
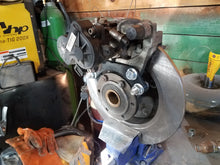
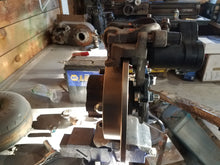
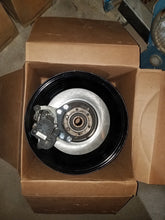
My original prototype for this system has been running for over a year now. That conversion project was specifically started to help support the later 1971-1975 Jeep Dana 44 30-spline axle with the semi-float one-piece axles. When jeep built those axles they changed the mounting pattern of the backing plate which precludes using my normal 'Trackick' style conversion. The first EEbrake prototype conversion used a VW based caliper. While the caliper and ebrake functioned amazingly well in early testing, the packaging of the that caliper left a lot to be desired. I decided to go back to the drawing board to hunt down a caliper that fixed those issues. What I ended up settling on was a Ford based caliper. (insert F-script jokes here). This new caliper has fixed all the issues identified on the original prototype as far as packaging concerns.
This EEbrake technology has frankly been amazing in testing. I have never seen a parking brake system work this well. When activated it seems near impossible to drive through the parking brake at all, even in 4low. This type of electro-hydraulic caliper does not require any power to hold the vehicle once set. It does however require power to both activate ( set ) the parking brake AND power to release the parking brake. Without power you won't be able to release the parking brake without disassembly of the caliper. This isn't a downside however, this could be a very good theft deterrent. The calipers can also be activated independently left or right to function as a crude type of cutting/steering brake system. The hydraulic function of the caliper is completely independent of the parking brake function. The hydraulic caliper will function without the park brake motor being active or supplied with power as long as it has been released. The park brake function of the caliper will work as an emergency brake as long as the control system has power if the hydraulic line was to fail. If you happen to have the capability to 'front-dig' with the transfer case system in your vehicle, these calipers can provide excellent holding power for that technique.
I want to be clear, at this point and time this is a BETA type conversion. I have gone as far as I can in the prototype phase. Old jeeps can be a bit of a fickle creature when it comes to making aftermarket parts fit them well. Honestly, they where built in a time before computer aided design and manufacturing. This means that measuring one part for development may not necessarily reflect the sum total of the tolerance for all the parts produced. That is where the 'beta' test group comes in. I will be offering this conversion to a smaller group of enthusiasts, at a reduced price, in order to gather more data. Once the beta testing has concluded, the price for this conversion will be going up. This conversion requires more pieces than my 'Trackick' conversion and will unfortunately dictate a higher cost. This beta test is for early jeeps only, primarily 1971-1975+ Dana 44 rear axles. I was able to design this conversion to be backwards compatible for 1941-1970 rear axles luckily. The early axles will require a different caliper offset than the later axles. I am not interested in making this conversion to support other vehicles at this point, but if you have an application in mind please drop me a note so that I can track interest in various platforms.
What is included in this conversion-
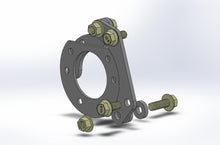
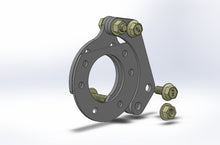
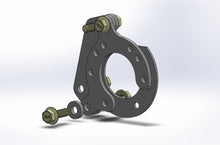
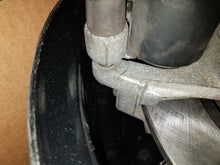
2- Axle side 'EEbrake' conversion brackets ( Laser cut 1/4" steel )
2- Caliper side 'EEbrake' mounting brackets ( Laser cut 1/4" steel )
2- 71-75 Backing plate replacement shims ( Laser cut 10 gauge steel )
4- Offset Spacers ( Laser cut 10 gauge steel )
8- Offset Spacers ( Laser cut 1/4" steel )
4- M12 washers (which can be used as smaller shims)
4- Caliper Mounting Bolts
4- Shim Bolts
4- Nuts ( for Shim Bolts )
USPS flat rate shipping in the USA is provided in the cost.
What you will need to provide for this conversion-
Rotors-
-Use 1995 or earlier Geo Tracker/Suzuki Sidekick non-vented front rotors (These are available at any parts house or online at places like Rock Auto ).
Part cross applications-
GEO TRACKER 1989-1995
SUZUKI SAMURAI 1988-1995
SUZUKI SIDEKICK 1989-1995
The rotors may need to be drilled out to match any wheel stud shoulder protruding the axle flange.
The rotor needs to sit completely flat against the axle flange
It is advisable to check overall lateral run-out on the axle flange to ensure it has not been bent. The caliper has a 'float' function, but can only deal with so much lateral runout.
Check that the stock wheel studs provide enough length for your wheel choice.
Calipers-
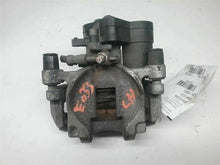
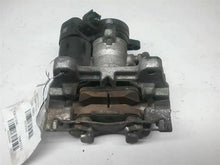
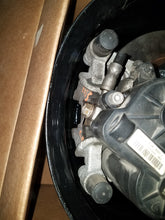
This conversion uses a late model 'Ford Fusion' caliper. This caliper was however used on a lot of different ford products luckily. I believe the best source for these calipers to reduce cost is Ebay or Car-part. In the used market these calipers are available as low as ~40usd each including shipping. These are also available new from ford or re-manufactured from any parts house at a higher price point. You will need the caliper WITH its factory mount, the park brake motor ( and the park brake motor plug if possible clipped 6" back to give some pigtail length ). With millions of these vehicles on the road these calipers should be available for a long time. This is the current application cross for these calipers.
Note: Please ensure you are purchasing calipers with the '316' caliper stand. There is more than one version out there between hybrid and gas-powered vehicles. If you do end up with a great deal on complete 302 calipers, you can swap just the stands. Rockauto and others offer just the 316 caliper stands, part number is Motorcraft BRBCR17.
FORD EDGE 2015-2018
FORD ESCAPE 2017-2019
FORD FUSION 2013-2019
FORD POLICE RESPONDER HYBRID 2019
FORD SSV PLUG-IN HYBRID 2019
LINCOLN CONTINENTAL 2017-2018
LINCOLN MKC 2015-2018
LINCOLN MKX 2016-2018
LINCOLN MKZ 2013-2018
Pads-
From the applications listed above, rear calipers.
Brake lines-
The connection on the caliper is a M10 x 1.0 Banjo bolt
Beta Test info needed.
Install notes-
-The provided spacers are 'tabbed' to the brackets to provide for easy part shipping and reduced overall laser part count. They are to be broken free from the 'tree' assembly and the tabs cleaned up with a small file to grinder.
-The axle side conversion brackets are designed with an open C shape to allow installing them without having to remove the axle shaft retainer on 71-75+ axles. You will however need to completely remove the axle shaft from the housing to remove the stock drum brake backing plate and install the provided shim. On 41-70 axle the axle side bracket is designed to install just in-board of the dust seal. On a full-float conversion it would be installed outboard of the spindle. You will need to check the the hardware that retains the bracket for proper length. On semi-float axles this will generally mean replacing those bolts with new longer grade 8 hardware in 5 locations.
-The 41-70 axles do not require the use of the backing plate spacer. The factory backing plate can be deleted from the assembly and the axle end-play checked to be in spec.
-The rotation of the axle side conversion is 'set' by the mounting bolt pattern on the 71-75 axles. The brackets can however be mounted in a fore or aft configuration to move the calipers to the front or back to avoid the shock absorbers on custom installs. On 41-70 axles the mounting pattern is symmetric and the brackets can bolt on in any of the six clocking positions. On the 41-70 axles I would suggest starting with the two unused holes at the top being as close to 'level' as possible to position the caliper for easy bleeding.
-The caliper side conversion bracket is installed 'inboard' of the axle side bracket typically.
-Caliper offset. The offset of the caliper can change through the decades of applications this conversion will work on. There are many different offset spacers that can be used to shim the caliper both directions during assembly to center the caliper in its 'float' function over the rotor. The 71-75 axles seem to fit best with X/X" (beta test info) of spacers between the axle side and caliper side brackets to push the caliper away from the rotor more. The 41-70 axles seem to only need X/X" (beta test info ) of offset between the caliper bracket and the caliper. If you need something thinner than the provided thin spacer a M12 washer can be used.
-The short M12 bolts are typically used to connect the caliper to the caliper side conversion bracket. I would advise using Loctite 242 and 75ft-lbs torque.
-The long M12 bolts and nuts are typically used to connect the two conversion brackets together. I think it is best to run the bolt from the outside to the inside. This positions the nut on the inside where it can be accessed with a torque wrench and socket. I would advise using Loctite 242 and 75ft-lbs torque.
-The bolts can be swapped in position to help deal with odd offset or packaging issues. They are the same thread pitch.
-This conversion will work with a modern 15" wheel that has ~4" of backspacing or less. Early jeep wheels are not the same standardized SAE wheel shape. Some early jeep wheels, most notably early 1940-50s 15" wheels may require a spacer to clear the caliper. I do not recommend grinding the caliper.
-Disc brakes like a 2psi residual valve in the hydraulic circuit feeding them from the master cylinder to help deal with any lateral runout of the rotor/hub assembly. Make sure to defeat or delete the stock 10psi residual valve from your drum brake circuit if it is still function. 10psi will cause brake drag and heat if it is left intact in the hydraulic circuit.
How to control the Parking brake motor-
Beta development area
The plug for the motor is MOTORCRAFT WPT1506 {#AU2Z14S411DB, WPT1065}
These are available on Rock Auto, but I would suggest trying to purchase a 6" pigtail of the stock wiring harness with your calipers if you buy them used.
In its most simple form, the parking brake motor is just a 12V motor that is reversed by swapping polarity. One direction makes makes the park brake function go on. The opposite direction makes the park brake function go off.
The park brake motor only needs to be released to the point that the rotor is free to move. This typically only takes a second or two of motor activation.
The clamping force is determined by the amperage to the motor. The factory control system uses a current limiting driver for this. A control system in its simplest form can use something like a DPDT momentary switch to control both motor direction AND both motors at the same time. My general theory for controlling the motors would be to use a auto-resetting breaker to set the clamping force at say ~10amps per motor. The release side of the motor circuit would use a ~15amp per motor circuit to ensure that you always have more power to release the motor than you do to activate the parking brake. This bias can be adjusted based on if both caliper motors are wired together, or if they can be activated separately.
I would love to hear other ideas on how the caliper motors can be controlled.
If you want a completely 'off the shelf' control system, Willwood is now offering this ~400usd micro-controller logic system.
https://www.wilwood.com/hardware/HardwareProd?itemno=620-15487


